Okay, this isn't another OCD9 thread. I've had y VP9 since December. I love it. It shoots very well.
With that said, I've remarked in the past, that there was a pretty drastic 'hump' feeling during the take-up. It was pretty noticeable when the trigger bar and disconnector bar were lubed. If I used a spray cleaner on the trigger bar area when cleaning the gun and didn't oil that area, the trigger would severely bind up. That little 'hump' in the take up would require a pull of about 15lbs before breaking and pull straight through the actual sear release.
If I lubed it up, it would go back to just being an annoying 'hump'. I assumed this was normal, but everyone talked about how great the trigger pull was on the VP9 and while the actual break was okay, the take up was cludgey and chunky. I ignored it for a while and just lived with it, loving the gun all the same.
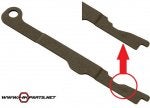
After I got the Ultra match spring kit which would cause the trigger to fail to reset about 40% of the time if it was released slowly, I took a look at these parts, trying to figure out what was causing that hump in the trigger pull. After some analysis, I realized it was right when the little tab on the trigger bar would hit the ramp on the disconnector, drawing it down to make contact with the sear actuation lever. I didn't really see too much wrong with the ramp, it was just a straight cut angle. So I took my small honing and polishing stones and worked the corner over for a while to give it a little more of a rounded curvature shape. I finished by polishing up the bit with some rouge. No power tools were used. This is just hand done. Not much material was being removed.
After I reassembled, I instantly noticed a dramatic improvement in the trigger pull. "This must be what everyone else was raving about!" I thought. I've lubed it and degreased it with a spray cleaner like I had before and it remains smooth with no binding. I'm thinking maybe the disconnector on mine was out of spec or something. Perhaps I'll try to order a replacement at some point, but for the time being, it seems to be working very well. It really improves the trigger pull of the gun. I still have a problem with unreliable reset using the ultra match trigger return spring, but the sear spring is in and working just fine. I like the combination.
If anyone is interested, this is the area that I rounded and polished. If any of you have a stagey feel to the trigger, give it a shot and see how it works.
![Image]()
With that said, I've remarked in the past, that there was a pretty drastic 'hump' feeling during the take-up. It was pretty noticeable when the trigger bar and disconnector bar were lubed. If I used a spray cleaner on the trigger bar area when cleaning the gun and didn't oil that area, the trigger would severely bind up. That little 'hump' in the take up would require a pull of about 15lbs before breaking and pull straight through the actual sear release.
If I lubed it up, it would go back to just being an annoying 'hump'. I assumed this was normal, but everyone talked about how great the trigger pull was on the VP9 and while the actual break was okay, the take up was cludgey and chunky. I ignored it for a while and just lived with it, loving the gun all the same.
After I got the Ultra match spring kit which would cause the trigger to fail to reset about 40% of the time if it was released slowly, I took a look at these parts, trying to figure out what was causing that hump in the trigger pull. After some analysis, I realized it was right when the little tab on the trigger bar would hit the ramp on the disconnector, drawing it down to make contact with the sear actuation lever. I didn't really see too much wrong with the ramp, it was just a straight cut angle. So I took my small honing and polishing stones and worked the corner over for a while to give it a little more of a rounded curvature shape. I finished by polishing up the bit with some rouge. No power tools were used. This is just hand done. Not much material was being removed.
After I reassembled, I instantly noticed a dramatic improvement in the trigger pull. "This must be what everyone else was raving about!" I thought. I've lubed it and degreased it with a spray cleaner like I had before and it remains smooth with no binding. I'm thinking maybe the disconnector on mine was out of spec or something. Perhaps I'll try to order a replacement at some point, but for the time being, it seems to be working very well. It really improves the trigger pull of the gun. I still have a problem with unreliable reset using the ultra match trigger return spring, but the sear spring is in and working just fine. I like the combination.
If anyone is interested, this is the area that I rounded and polished. If any of you have a stagey feel to the trigger, give it a shot and see how it works.


")