Good afternoon HKPro!-
I am incredibly excited to share some details of a project I have been working on for some time behind the scenes - A family of MR08 and MR09 alternatives affectionately dubbed MR.NEIN (Mister Nein). Before we drill into the project details, I am sure many of you are asking “Who the hell is this guy, and why should I care?” I’ll start there.
About Me:
My name is Dakota and I run a very small operation called MachineCraft Replicas, or just MachineCraft for short. MachineCraft has been in business since 2013 designing and selling metal replica costume parts for a popular Star Wars character, Boba Fett. If you’ve watched The Mandalorian Season 2/3 or The Book of Boba Fett, you have likely seen some of our parts used on screen for characters like Boba Fett (obviously), Cobb Vanth, Bo Katan, and several others.
I am not an engineer by trade but have developed a deep passion for CAD, metrology, and product development. I’ve invested significantly into tools to support this passion and decided earlier this year to branch out to service one of my favorite hobbies - Firearms. A couple of months ago we put out our first firearm accessory, the R8R, to great reception. The R8R is a low-profile mount for S&W R8 and TRR8 revolvers that allows you to mount RMR footprint optics directly as opposed to installing a 1913-to-RMR adapter on top of the factory picatinny rail, which puts the height over bore much higher than ideal.
When it comes to new firearm projects, I have (selfishly) chosen to work on parts that I want for myself. While I take MachineCraft and its reputation very seriously, it is still an extra curricular hobby at the end of the day. I made the R8R because I owned my TRR8 for 10 years and when I finally decided to put an optic on it, I hated how it looked and how hard it was to quickly locate the dot. In the same vein, I’ve begun attending local NV shoots and want to run my USP45-T. I picked up an MR09 to attach an IR laser to and was disappointed at how loose the mount sat on the gun; It turned my USP into a maraca. After researching and finding that others were experiencing the same thing with their 45’s, I set out to understand why and put on my wannabe engineer hat to solve the problem. Once the 45 frame mount design was completed, the effort to offer a solution for other USP frames was pretty trivial - so I did that too.
That’s enough about me; Let's get into project details, starting with the goals of the project.
Project Goals:
1) Understand and Resolve Issues - Simply put, I wanted to understand why people (myself included) were experiencing fit issues with the MR09. Was Surefire to blame? Are USP 45 frame dimensions different from their smaller caliber counterparts? Are tolerance and/or tolerance stacking issues coming into play? I spent an abundance of time researching and performing my own measurements and tests to come to the conclusion that all of the above factor into the known issues.
For said testing, I got my hands on two USP 45’s(USP45T, USP45), two USP 9’s (USP9T, USP9), and three USP Compacts (USP45CT, USP45C, USP9C). The ultimate conclusion I reached is that the Full-Size 45 and 9/40 frame slots do have different dimensions, the tolerances and dimensions on the production MR08 and MR09’s vary greatly, and the Compact frames do not have the frame slot differences that the Full Size frames do.
I will go into more details below, but the battery door used also plays a very significant role in light compatibility and fit.
2) Improve Upon the Design - With a clear understanding of the problems, I set out to engineer what I felt to be the RIGHT solutions to make the best mount available. One thing that I noticed is that the rail fitment on the old GG&G mount I had was incredibly snug, to the point that it is difficult to pull out of the frame slots. The MR08/MR09 on the other hand was a very loose fit in the frame slots. Thus, I used similar geometry of the GG&G slot mount to provide a superior fit.
The MR08 and MR09’s I tested on my USP’s all also have a little front to back play on the rail and do not tighten enough to clamp onto the frame when fully tightened. The tightness issue can be solved by purposely engineering a small gap between the parts when the rail mounts are fully seated on the frame. I found very early on that the depth of the frame slots are much deeper on the 45 frames I tested than the 9/40 frames, so when I resin printed my first prototype (designed for the 45), the gap between the parts on a USP9 was larger than I was comfortable with (meaning it would squeeze the frame much harder when tightened down). Thus, I decided that the right approach to take would be to make 2 versions for the Full Size mounts. Surprisingly this was not an issue with the Compact models and the slot specs are all nearly identical on the 3 that I have tested. The front to back play I mentioned earlier is unfortunately necessary to ensure that the parts can align correctly. However, I elongated the rail mounts in the design and placed tight tolerances in the places that matter to reduce this play considerably and provide arguably the best fit possible for a 2-piece design such as this.
In general, I put some very tight tolerances around these parts and tried to solve for inconsistencies using the small sample size of guns that I have. While I have no doubt there will be some lessons to be learned with some variant or particular frame, I feel confident that one of the models I've designed will get the job done. SIDE NOTE: Something small that bugged me about the MR08/MR09 is the stainless hardware. In my opinion, polished stainless sticks out like a sore thumb on an otherwise all black setup. So, in addition to stainless hardware, we will also be providing a set of black oxide finished stainless screws with each mount. Kits will include 3 of each color (in case you break one somehow) - Run whichever you prefer.
3) Attainability - Not going to spend a whole lot of time on this one. The market price on MR08 and MR09’s has ballooned ridiculously. Most people probably don’t want to spend hundreds of dollars to bring their USP into the 21st century. So, in addition to wanting to make the best mount available, I wanted to make it at the best price available. The MR.NEIN family will be available at launch for $99.99 or NEIN NEIN NEIN NEIN (Regular Price: $129).
The other half of attainability is availability. We plan to offer MR.NEIN continuously, provided we can keep them in stock at this price. As long as there is a healthy demand for them, we will keep making them. So if you get one and are happy with it, maybe send some other USP owners our way?")
Models:
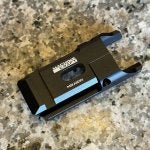
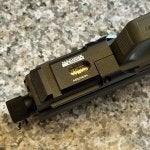
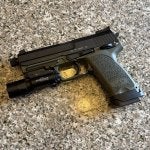
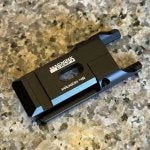
1) MR.NEIN - USP 9/40 Full Size Models
![]()
![]()
![]()
![]()
![]()
2) MR.NEIN 45 - USP 45 Full Size Models
![]()
![]()
![]()
![]()
3) MR.NEIN JR. - All USP Compact Models (That we have tested)
![]()
![]()
![]()
![]()
![]()
Features:
NOTE: While these mounts are made to accommodate Surefire X300 lights, you will need to follow one of the installation methods mentioned below in the X300 Installation Method section. X300 ”B” models (Ultra or Turbo) are the most compatible variant and will mount most securely to MR.NEIN.
Where to Buy:
MR.NEIN - MR.NEIN - MR09 Alternative for Full Size USP Models
MR.NEIN 45 - MR.NEIN - MR09 Alternative for Full Size USP Models
MR.NEIN JR. - MR.NEIN JR. - MR08 Alternative for USP Compact Models
When will MR.NEIN be available?:
We will have 80 units of each MR.NEIN model listed on the website tomorrow at 10AM CST. After these units sell out, we will change the product listing to a pre-order. We will have approximately 100 more units of each model we estimate will ship late August to early September (pending successful QC). We will clearly mark the product selection and/or product listing with “PRE-ORDER” if the item you’re ordering is no longer in stock. If you order an in-stock item and pre-order item together, it will ship once the pre-order item arrives.
Kits Include:
1x MR.NEIN Rail Interface Adapter
3x 18-8 Stainless Steel 4-40 x ½” Socket Head Screws
3x Black Oxide 18-8 Stainless Steel 4-40 x ½” Socket Head Screws
1x 3/32” Hex Wrench
1x Operator’s Manual
Confirmed Light Compatibility:
Surefire X300U-A*
Surefire X300U-B*
Surefire X300T-A*
Surefire X300T-B*
Surefire X200 (Legacy Model)
Streamlight TLR-1 HL
Streamlight TLR-2 HL
Streamlight TLR-7 HL-X
Streamlight TLR-8 HL-X
*X300 Installation Methods:
Below are the various ways you can install an X300 on your MR.NEIN equipped USP. These are ordered from cheapest to most expensive. We will do our best to spell out the pros and cons of each of the methods
1) Universal Key - The X300’s that I have used for testing have all come with the “Universal Key” pre-installed. This rail key is much more narrow than a Picatinny 1913 Key, which allows both A and B variant lights to install without any trouble. The downside to this method is that it does position the light further forward, which may make it harder for some users to activate the switches.
2) J.T.B. (X300 B Variants Only) - Due to a design change, new style battery doors run into the trigger guard of USP’s using an MR09 style adapter. If you use a B-variant light you can apply rearward and upward pressure while tightening the thumbscrew to get the light installed. In other words, you “Jam That B****” into the trigger guard and tighten it down. While many others appear to have done this with other MR09 variants, we cannot speak to the long-term effects of this method. Do this at your own risk - it is not our preferred or recommended method of installation.
3) File New Style Battery Door - A slight amount of material can be filed from a new style battery door to provide enough clearance so that the battery door is no longer pushing into the trigger guard. However, when Surefire changed the battery doors, it appears that they made the switch internals larger, so it is very easy to break through the plastic and into the internals housing. Doing so would render the unit no longer watertight. Because of the dimension change to the switch internals, even filing a new style battery door will not allow the light to sit as far back as the next 2 options.
4) Aftermarket Battery Door - Frustrated with the limited availability of the old style battery doors, I stumbled on a clone battery door that was made in the style of the old Surefire doors. This unit shipped straight from China and took about 3 weeks to be delivered. The pins holding in the wedge block are not held in place nearly as well as genuine legacy Surefire units and just pushed out using a punch - no hammer required. The door was a tight fit with one of my lights, but fit them all and does have a rubber gasket. I cannot speak to the long term performance of one of these doors, but I can confirm that it did install and function on all of my lights. The switch lever itself requires significantly less effort to activate (a little more than a TLR-1), and the forward press momentary function has a tactile click which I actually prefer over the mushy Surefire momentary. This door does allow the light to mount much further back than any of the above options, putting the switches closer to your reach.
I plan to sell these as an add-on with MR.NEIN as a convenience, but have not received any stock. If you’d like to buy one of these, they can be found here: Tactical Remote Dual Pressure Switch Assembly for X300 X400 Series Pistol Light | eBay
5) Legacy Surefire Battery Door (Z-XBC) - Legacy Surefire battery doors used to feature a block held in place with 4 small stainless pins. Using a hammer and punch, these pins and thus the block can be removed, allowing room for the battery door to straddle the trigger guard and ultimately allowing the light to sit as far back as possible. These doors were discontinued a few years ago according to Surefire. X200’s also had this style door, and the MR09 was designed for the X200; this is the primary reason modern X300’s do not fit MR09’s well. I believe this is the best overall solution in terms of both fitment and reliability and what I would recommend for serious/duty use. Please note that while Surefire changed the battery door design, the part number (Z-XBC) is unchanged. If you attempt to locate one of these doors, you will need to see a photo from the side to verify that the silver pins are present. You will probably not find one from a retailer and should not trust a stock photo as it could just be a photo of the old part but you’ll receive a new part.
We do have a limited supply of these doors available to pair with MR.NEIN purchases (I am going to try and get the add-on functionality working before launch but no guarantees). However, I want to be fully transparent in saying that these are NOT going to be priced competitively. This is because we would prefer to maintain a stock of these doors for those who really need them and cannot source them elsewhere. Surefire advised that they have no plans to produce this style of door again, even if it involved a large order.
6) Surefire DG Remote Switch - Surefire still produces and sells remote switches for USP (DG-19) and USP Compacts(DG-15). These switches replace the battery door of your X300 and allow you to activate the light using a pressure pad located on the grip directly under the trigger guard. Personally, I found this to be most useful on Full-Size USP’s due to how far forward lights mount due to the trigger guard. These switches do still feature the lever found on the standard battery door for constant on functionality. Despite still being produced, the DG-19 I tested does still contact the trigger guard and mirrors the fit of the J.T.B. method mentioned above.
Additional Project Supplies:
I try to be as thorough as possible when R&D’ing a product. This is a manifest of additional items needed to develop MR.NEIN.
MR09
MR08
USP9T
USP45CT
Surefire x300T-A
Surefire x300U-B
Surefire x200
Several Legacy Z-XBC Battery Covers
DG-15 Switch
2x DG-19 Switches
GG&G USP Compact Rail
Surefire XVL2 - (Won’t fit without filing. Can’t decide if I’ll do it…)
9mm Ammo for Testing - 1x case
45ACP Ammo for Testing - 2x case
Streamlight TLR8 HL-X
If you made it this far, thanks for reading! I realize that this is a giant information dump and there will probably be questions. I also realize that these types of projects typically unfold as a project post over a course of time, so if you’d like to see more information about the development process of MR.NEIN, let me know and I will see what I can do.
Today’s my birthday, so if I am a little slow to respond here I apologize. Looking forward to getting MR.NEIN into the hands of other USP fanatics!
Dakota
MachineCraft
I am incredibly excited to share some details of a project I have been working on for some time behind the scenes - A family of MR08 and MR09 alternatives affectionately dubbed MR.NEIN (Mister Nein). Before we drill into the project details, I am sure many of you are asking “Who the hell is this guy, and why should I care?” I’ll start there.
About Me:
My name is Dakota and I run a very small operation called MachineCraft Replicas, or just MachineCraft for short. MachineCraft has been in business since 2013 designing and selling metal replica costume parts for a popular Star Wars character, Boba Fett. If you’ve watched The Mandalorian Season 2/3 or The Book of Boba Fett, you have likely seen some of our parts used on screen for characters like Boba Fett (obviously), Cobb Vanth, Bo Katan, and several others.
I am not an engineer by trade but have developed a deep passion for CAD, metrology, and product development. I’ve invested significantly into tools to support this passion and decided earlier this year to branch out to service one of my favorite hobbies - Firearms. A couple of months ago we put out our first firearm accessory, the R8R, to great reception. The R8R is a low-profile mount for S&W R8 and TRR8 revolvers that allows you to mount RMR footprint optics directly as opposed to installing a 1913-to-RMR adapter on top of the factory picatinny rail, which puts the height over bore much higher than ideal.
When it comes to new firearm projects, I have (selfishly) chosen to work on parts that I want for myself. While I take MachineCraft and its reputation very seriously, it is still an extra curricular hobby at the end of the day. I made the R8R because I owned my TRR8 for 10 years and when I finally decided to put an optic on it, I hated how it looked and how hard it was to quickly locate the dot. In the same vein, I’ve begun attending local NV shoots and want to run my USP45-T. I picked up an MR09 to attach an IR laser to and was disappointed at how loose the mount sat on the gun; It turned my USP into a maraca. After researching and finding that others were experiencing the same thing with their 45’s, I set out to understand why and put on my wannabe engineer hat to solve the problem. Once the 45 frame mount design was completed, the effort to offer a solution for other USP frames was pretty trivial - so I did that too.
That’s enough about me; Let's get into project details, starting with the goals of the project.
Project Goals:
1) Understand and Resolve Issues - Simply put, I wanted to understand why people (myself included) were experiencing fit issues with the MR09. Was Surefire to blame? Are USP 45 frame dimensions different from their smaller caliber counterparts? Are tolerance and/or tolerance stacking issues coming into play? I spent an abundance of time researching and performing my own measurements and tests to come to the conclusion that all of the above factor into the known issues.
For said testing, I got my hands on two USP 45’s(USP45T, USP45), two USP 9’s (USP9T, USP9), and three USP Compacts (USP45CT, USP45C, USP9C). The ultimate conclusion I reached is that the Full-Size 45 and 9/40 frame slots do have different dimensions, the tolerances and dimensions on the production MR08 and MR09’s vary greatly, and the Compact frames do not have the frame slot differences that the Full Size frames do.
I will go into more details below, but the battery door used also plays a very significant role in light compatibility and fit.
2) Improve Upon the Design - With a clear understanding of the problems, I set out to engineer what I felt to be the RIGHT solutions to make the best mount available. One thing that I noticed is that the rail fitment on the old GG&G mount I had was incredibly snug, to the point that it is difficult to pull out of the frame slots. The MR08/MR09 on the other hand was a very loose fit in the frame slots. Thus, I used similar geometry of the GG&G slot mount to provide a superior fit.
The MR08 and MR09’s I tested on my USP’s all also have a little front to back play on the rail and do not tighten enough to clamp onto the frame when fully tightened. The tightness issue can be solved by purposely engineering a small gap between the parts when the rail mounts are fully seated on the frame. I found very early on that the depth of the frame slots are much deeper on the 45 frames I tested than the 9/40 frames, so when I resin printed my first prototype (designed for the 45), the gap between the parts on a USP9 was larger than I was comfortable with (meaning it would squeeze the frame much harder when tightened down). Thus, I decided that the right approach to take would be to make 2 versions for the Full Size mounts. Surprisingly this was not an issue with the Compact models and the slot specs are all nearly identical on the 3 that I have tested. The front to back play I mentioned earlier is unfortunately necessary to ensure that the parts can align correctly. However, I elongated the rail mounts in the design and placed tight tolerances in the places that matter to reduce this play considerably and provide arguably the best fit possible for a 2-piece design such as this.
In general, I put some very tight tolerances around these parts and tried to solve for inconsistencies using the small sample size of guns that I have. While I have no doubt there will be some lessons to be learned with some variant or particular frame, I feel confident that one of the models I've designed will get the job done. SIDE NOTE: Something small that bugged me about the MR08/MR09 is the stainless hardware. In my opinion, polished stainless sticks out like a sore thumb on an otherwise all black setup. So, in addition to stainless hardware, we will also be providing a set of black oxide finished stainless screws with each mount. Kits will include 3 of each color (in case you break one somehow) - Run whichever you prefer.
3) Attainability - Not going to spend a whole lot of time on this one. The market price on MR08 and MR09’s has ballooned ridiculously. Most people probably don’t want to spend hundreds of dollars to bring their USP into the 21st century. So, in addition to wanting to make the best mount available, I wanted to make it at the best price available. The MR.NEIN family will be available at launch for $99.99 or NEIN NEIN NEIN NEIN (Regular Price: $129).
The other half of attainability is availability. We plan to offer MR.NEIN continuously, provided we can keep them in stock at this price. As long as there is a healthy demand for them, we will keep making them. So if you get one and are happy with it, maybe send some other USP owners our way?
Models:
1) MR.NEIN - USP 9/40 Full Size Models


2) MR.NEIN 45 - USP 45 Full Size Models


3) MR.NEIN JR. - All USP Compact Models (That we have tested)


Features:
- 2-piece design prevents loosening and sagging issues common with other USP rail adapters - no more losing zero on laser aiming devices
- Precision machined from 7075 T6 Aluminum and Type III Hardcoat Anodized for superior strength and durability
- Offered in 3 frame-specific designs with extremely tight tolerances to provide the best fit possible for every USP frame
- Designed for Surefire X300 series weapon lights*, but compatible with most popular lights. Please reference our light compatibility guide for full details
NOTE: While these mounts are made to accommodate Surefire X300 lights, you will need to follow one of the installation methods mentioned below in the X300 Installation Method section. X300 ”B” models (Ultra or Turbo) are the most compatible variant and will mount most securely to MR.NEIN.
Where to Buy:
MR.NEIN - MR.NEIN - MR09 Alternative for Full Size USP Models
MR.NEIN 45 - MR.NEIN - MR09 Alternative for Full Size USP Models
MR.NEIN JR. - MR.NEIN JR. - MR08 Alternative for USP Compact Models
When will MR.NEIN be available?:
We will have 80 units of each MR.NEIN model listed on the website tomorrow at 10AM CST. After these units sell out, we will change the product listing to a pre-order. We will have approximately 100 more units of each model we estimate will ship late August to early September (pending successful QC). We will clearly mark the product selection and/or product listing with “PRE-ORDER” if the item you’re ordering is no longer in stock. If you order an in-stock item and pre-order item together, it will ship once the pre-order item arrives.
Kits Include:
1x MR.NEIN Rail Interface Adapter
3x 18-8 Stainless Steel 4-40 x ½” Socket Head Screws
3x Black Oxide 18-8 Stainless Steel 4-40 x ½” Socket Head Screws
1x 3/32” Hex Wrench
1x Operator’s Manual
Confirmed Light Compatibility:
Surefire X300U-A*
Surefire X300U-B*
Surefire X300T-A*
Surefire X300T-B*
Surefire X200 (Legacy Model)
Streamlight TLR-1 HL
Streamlight TLR-2 HL
Streamlight TLR-7 HL-X
Streamlight TLR-8 HL-X
*X300 Installation Methods:
Below are the various ways you can install an X300 on your MR.NEIN equipped USP. These are ordered from cheapest to most expensive. We will do our best to spell out the pros and cons of each of the methods
1) Universal Key - The X300’s that I have used for testing have all come with the “Universal Key” pre-installed. This rail key is much more narrow than a Picatinny 1913 Key, which allows both A and B variant lights to install without any trouble. The downside to this method is that it does position the light further forward, which may make it harder for some users to activate the switches.
2) J.T.B. (X300 B Variants Only) - Due to a design change, new style battery doors run into the trigger guard of USP’s using an MR09 style adapter. If you use a B-variant light you can apply rearward and upward pressure while tightening the thumbscrew to get the light installed. In other words, you “Jam That B****” into the trigger guard and tighten it down. While many others appear to have done this with other MR09 variants, we cannot speak to the long-term effects of this method. Do this at your own risk - it is not our preferred or recommended method of installation.
3) File New Style Battery Door - A slight amount of material can be filed from a new style battery door to provide enough clearance so that the battery door is no longer pushing into the trigger guard. However, when Surefire changed the battery doors, it appears that they made the switch internals larger, so it is very easy to break through the plastic and into the internals housing. Doing so would render the unit no longer watertight. Because of the dimension change to the switch internals, even filing a new style battery door will not allow the light to sit as far back as the next 2 options.
4) Aftermarket Battery Door - Frustrated with the limited availability of the old style battery doors, I stumbled on a clone battery door that was made in the style of the old Surefire doors. This unit shipped straight from China and took about 3 weeks to be delivered. The pins holding in the wedge block are not held in place nearly as well as genuine legacy Surefire units and just pushed out using a punch - no hammer required. The door was a tight fit with one of my lights, but fit them all and does have a rubber gasket. I cannot speak to the long term performance of one of these doors, but I can confirm that it did install and function on all of my lights. The switch lever itself requires significantly less effort to activate (a little more than a TLR-1), and the forward press momentary function has a tactile click which I actually prefer over the mushy Surefire momentary. This door does allow the light to mount much further back than any of the above options, putting the switches closer to your reach.
I plan to sell these as an add-on with MR.NEIN as a convenience, but have not received any stock. If you’d like to buy one of these, they can be found here: Tactical Remote Dual Pressure Switch Assembly for X300 X400 Series Pistol Light | eBay
5) Legacy Surefire Battery Door (Z-XBC) - Legacy Surefire battery doors used to feature a block held in place with 4 small stainless pins. Using a hammer and punch, these pins and thus the block can be removed, allowing room for the battery door to straddle the trigger guard and ultimately allowing the light to sit as far back as possible. These doors were discontinued a few years ago according to Surefire. X200’s also had this style door, and the MR09 was designed for the X200; this is the primary reason modern X300’s do not fit MR09’s well. I believe this is the best overall solution in terms of both fitment and reliability and what I would recommend for serious/duty use. Please note that while Surefire changed the battery door design, the part number (Z-XBC) is unchanged. If you attempt to locate one of these doors, you will need to see a photo from the side to verify that the silver pins are present. You will probably not find one from a retailer and should not trust a stock photo as it could just be a photo of the old part but you’ll receive a new part.
We do have a limited supply of these doors available to pair with MR.NEIN purchases (I am going to try and get the add-on functionality working before launch but no guarantees). However, I want to be fully transparent in saying that these are NOT going to be priced competitively. This is because we would prefer to maintain a stock of these doors for those who really need them and cannot source them elsewhere. Surefire advised that they have no plans to produce this style of door again, even if it involved a large order.
6) Surefire DG Remote Switch - Surefire still produces and sells remote switches for USP (DG-19) and USP Compacts(DG-15). These switches replace the battery door of your X300 and allow you to activate the light using a pressure pad located on the grip directly under the trigger guard. Personally, I found this to be most useful on Full-Size USP’s due to how far forward lights mount due to the trigger guard. These switches do still feature the lever found on the standard battery door for constant on functionality. Despite still being produced, the DG-19 I tested does still contact the trigger guard and mirrors the fit of the J.T.B. method mentioned above.
Additional Project Supplies:
I try to be as thorough as possible when R&D’ing a product. This is a manifest of additional items needed to develop MR.NEIN.
MR09
MR08
USP9T
USP45CT
Surefire x300T-A
Surefire x300U-B
Surefire x200
Several Legacy Z-XBC Battery Covers
DG-15 Switch
2x DG-19 Switches
GG&G USP Compact Rail
Surefire XVL2 - (Won’t fit without filing. Can’t decide if I’ll do it…)
9mm Ammo for Testing - 1x case
45ACP Ammo for Testing - 2x case
Streamlight TLR8 HL-X
If you made it this far, thanks for reading! I realize that this is a giant information dump and there will probably be questions. I also realize that these types of projects typically unfold as a project post over a course of time, so if you’d like to see more information about the development process of MR.NEIN, let me know and I will see what I can do.
Today’s my birthday, so if I am a little slow to respond here I apologize. Looking forward to getting MR.NEIN into the hands of other USP fanatics!
Dakota
MachineCraft